
by Ola Ajibode | May 1, 2023 | Automation, Bash, General, Python
Conda is a popular open-source package manager and environment management system used for Python programming language. It is widely used by data scientists and machine learning engineers for managing packages and dependencies. In some cases, you may need to remove all environments in Conda. This can be helpful when you want to start with a clean slate or when you want to switch to a different version of Conda. In this blog post, we will discuss how to remove all environments in Conda.
Before we begin, it is important to note that removing all environments in Conda will delete all your existing environments and their associated packages. This process is irreversible, so it is recommended that you create a backup of your environment and package information before proceeding with the removal process. You can follow the steps below to achieve your goal.
Step 1: Open the Anaconda prompt or terminal The first step to removing all environments in Conda is to open the Anaconda prompt or terminal. You can do this by searching for “Anaconda prompt” or “Anaconda terminal” in your operating system’s search bar.
Step 2: Deactivate all active environments Before you can remove all environments, you must first deactivate all active environments. You can do this by running the following command in the Anaconda prompt or terminal:
conda deactivate
This will deactivate all active environments, and you will see that your prompt or terminal no longer displays the name of the active environment.
Step 3: Remove all environments To remove all environments in Conda, you can use the conda env list command to list all existing environments, and then use a loop to remove each environment one by one. Run the following commands in the Anaconda prompt or terminal:
conda env list
This command will list all the environments that you have created in Conda. Make sure that you have deactivated all active environments before running the following command:
for env in $(conda env list | awk '{print $1}' | grep -v '#' | grep -v 'base' | grep -v 'Name'); do
    conda remove --name $env --all -y
done
This loop will remove all environments except for the base environment, which is the default environment created by Conda.
Step 4: Confirm removal After running the loop to remove all environments, you can confirm that all environments have been removed by running the conda env list command again. This command should now display only the base environment.
In conclusion, removing all environments in Conda is a simple process that involves deactivating all active environments and then using a loop to remove each environment one by one. It is important to note that this process is irreversible, so it is recommended that you create a backup of your environment and package information before proceeding with the removal process.

by Ola Ajibode | Jun 9, 2020 | Automation, Bash, General, Shell
Docker has changed our world. A very useful component in the toolbox of any Software Engineer or perhaps, any forward-thinking company. What is Docker? Why Docker? and other questions relating to the topic starts here: Docker
Sometimes, you are just too annoyed with the state of your machine and need to stop all running containers, here is a simple command:
#stop all running docker containers
docker stop $(docker ps -a -q)
#remove all docker containers
docker rm $(docker ps -a -q)
Unfortunately, that’s still not enough for the lazy engineer, simply add this as an alias in your bash/zsh profile and then you can call that command in a consistent and easy manner.
#!/usr/bin sh
#I am either .bashrc or .zshrc or .bash_profile or whatever profile you use
alias docker_stop_all='docker stop $(docker ps -a -q)'
alias docker_remove_all='docker rm $(docker ps -a -q)'
Hope this helps.

by Ola Ajibode | Dec 12, 2018 | General
To ensure Jest ignores CSS files when running tests, simply follow the steps below:
- Install a module:
`identity-obj-proxy`
npm install -D identity-obj-proxy
2. Update your jest config(jest.config.json)
{
  "jest":{
     "moduleNameMapper": {
      "\\.(jpg|jpeg|png|gif|eot|otf|webp|svg|ttf|woff|woff2|mp4|webm|wav|mp3|m4a|aac|oga)$": "/__mocks__/fileMock.js",
      "\\.(css|less|scss|sass)$": "identity-obj-proxy"
    },
  }
}
Now run your tests again. You should not see failures due to CSS files anymore.
by Ola Ajibode | Jul 16, 2016 | Elasticsearch, General
By running a custom-built Elasticsearch on AWS, you have to do everything on the console. AWS has its Elasticsearch offering but I had this project handed over to me and it’s running an old instance of Elasticsearch before AWS had its own.
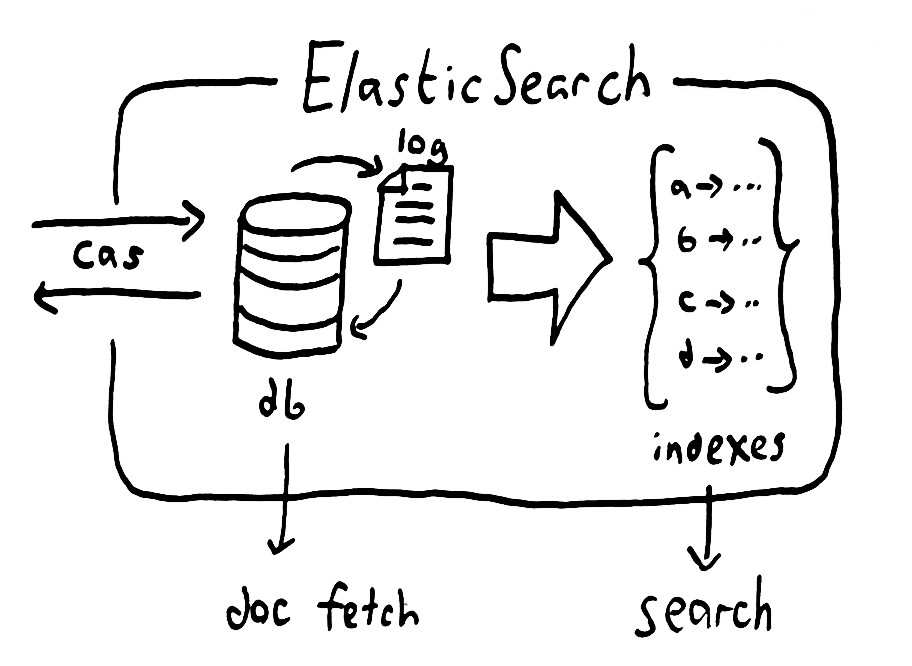
Data pollution is a common problem and you have to know exactly what to do to ensure effective cleansing of such data when it happens. So, I had a case of polluted data that if not treated will put my client in a very bad state – such that the customers can sue my client. First and foremost, the data pollution was not my fault. With that out of the way, I had to trace the journey of the data to identify the source of the pollution. Let me describe the system a bit, so you get the picture. The infrastructure has 4 main components. The first component is a system that generates CSV files based on user searches. The second component inserts each user search field value in a database(sort of). The third component picks up the generated CSV files, populates an instance of Elasticsearch and deletes the CSV file after 3 hours in which case 2 other new files have been added to the CSV repository.
# # Elasticsearch Monitoring

# Cluster Health

# Green: excellent

# Yellow: one replica is missing

# Red: at least one primary shard is down

curl -X GET http://localhost:9200/_cluster/health | python -m json.tool

curl -X GET http://${ip_address}:9200/_cluster/health | python -m json.tool

# Specific Cluster Health

curl -XGET http://localhost:9200/_cluster/health?level=indices | python -m json.tool

# Check Status via colours - green, yellow, red

curl -XGET http://localhost:9200/_cluster/health?wait_for_status=green | python -m json.tool

# Shard level

curl -XGET http://localhost:9200/_cluster/health?level=shards | python -m json.tool

curl -XGET http://localhost:9200/_all/_stats | python -m json.tool

# Bikes

curl -XGET http://localhost:9200/bike_deals/_stats | python -m json.tool

# Cars

curl -XGET http://localhost:9200/car_deals/_stats | python -m json.tool

# Multiple indices check

curl -XGET http://localhost:9200/bike_deals,car_deals/_stats | python -m json.tool

# Check Nodes

curl -XGET http://localhost:9200/_nodes/_stats | python -m json.tool

# DELETE all deals on specific index on Elastic

curl -XDELETE 'http://localhost:9200/bike_deals/?pretty=true' | python -m json.tool #powerful! Be careful!!!!

curl -XDELETE 'http://localhost:9200/bike_deals/_query' -d '{ "query" : { "match_all" : {} } }' | python -m json.tool

curl -XDELETE 'http://localhost:9200/car_deals/_query' -d '{ "query" : { "match_all" : {} } }'